

Hello and welcome back to finally another crafting guide! So, you are looking for a way to store your stickers. While doing research, you realize all the sticker books you’ve looked at are smaller than you’d like and, most importantly, they are expensive! Sticker books tend to be around $20.00-$25.00 for just 50 double-sided A5 size pages! As someone who has bought sticker books in the past, I too have had the same issue of finding the perfect sticker storage. After many hours of research, I have started to make my own sticker books; the first being from several years ago. Because of my history of sticker storage experimentation, I have decided to share the scoop on how to make the ULTIMATE sticker book!
Binders
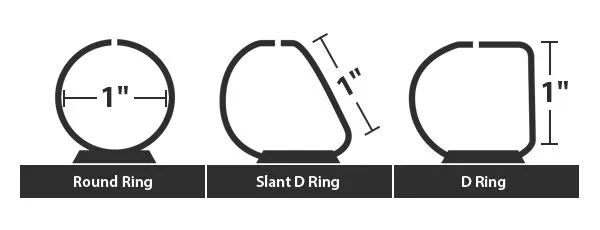
- First things first, you need a 3-ring binder. While the size of the binder isn’t important, what is important is that the binder is a D-ring instead of an O-ring. To further clarify, the terms D-ring and O-ring refer to the shape of the binder’s rings. The reason why ring shape is important is because an O-ring can crease the paper if the ring rolls onto a page. Now, you can use an O-ring binder if that’s the only thing you have and damage from an O-ring is not guaranteed, but it is something to be mindful of.
Sticker Pages
Now, for your sticker album, there are a variety of different pages you can make and/or use. I will go through each type in detail with both their pros and cons.

- Sticker Release paper. Sticker release paper is paper specifically made to be the backing of stickers. It can be both single-sided or double-sided, and is paper coated in silicone. The only con with this option is it can be a little pricey. Overall though, this is the best option if you don’t care about budget.
- Sticker release paper. Sticker release paper are silicone coated sheets specifically made to be the backing of stickers. It can be both single-sided or double-sided. The only con with this option is it can be a little pricey, which is the reason why many artist-made sticker books are a little expensive. Overall though, this is the best option if you don’t care about budget.
- Mailing label pages. This is what I personally use for all of my sticker books. These tend to be more ‘budget friendly’ than sticker release paper, despite being silicone coated paper as well. One downside to these is that they do not come double-sided. Luckily, you can staple each edge of the sheet to make them double-sided if you want to maximize your sticker space. It is important to note that all label backings are not equal. Meaning, one brands backing paper will not hold stickers as well as others. So, if you choose this option make sure you test the paper first. Sticker damage is not something you need to worry about when testing, but make sure the stickers do not fall off the pages. This type of page is what I would consider to be the best budget friendly option.
- Cling Photo pages. I use these as well, usually for stickers I don’t want to peel or take out of the package. These type of pages are very affordable and you can find a lot of photo cling pages at the thrift store. The con for these is, you need to be careful on what photo cling pages you use. Avoid pages that are sticky with adhesive or where the cling is too strong. This isn’t a huge concern, as most brands of pages don’t have this issue but keep that in mind that cheaper pages may have too harsh of adhesive and damage your sticker!
- Wax paper. I used wax paper sheets for sticker collecting for about a year and I personally do NOT recommend them. Some stickers will tear the wax paper when peeling and become less sticky. Be very cautious about putting vinyl, large, or thin stickers on this type of page. If you do decide to go this route, I recommend sticking the wax paper on card stock using double sided tape (shiny side away from the paper) to make them more sturdy.
Other Options include:
- Cellophane sticker backings. I only recommend using these temporarily or for thicker high quality stickers (Example: Pipsticks brand)
- Page protectors. Allows you to switch out backgrounds, but it does not work well for all stickers.
Sticker page conclusion:
If you don’t want to pay for specialty sticker release paper; label backings are effective storage for all types of stickers. Things like page protectors and cellophane sheets will also work for a smaller amount of sticker types, but they are not adequate storage for all stickers. Avoid wax paper pages as they will stick to some stickers permanently.
Page Protectors
Okay, so you got your pages ready, what else do you need, that’s all there is too it, right? Sure you can stop here, punch holes in your pages if needed and call it a day. However, we can take this a step further.
- Page protectors. Silicone or wax coated material draws in dust and is a magnetic for particles. To remedy this, we need to make a page cover that protects the page while also allowing for easy access. First, take a pair of scissors and stick one blade into the page protector; cutting along the clear edge. Do NOT cut the page protector all the way down! Cutting the page all the way down will allow your sticker page to fall out and damage your stickers!! Instead, leave a inch or two of the page uncut. I find if you are using a standard size pair of scissors you can just stop cutting when the blade hits the bottom of the protector for the perfect pocket!
Step by Step my way
Okay, so you got your pages ready, what else do you need, that’s all there is too it, right? Sure you can stop here, punch holes in your pages if needed and call it a day. However, we can take this a step further.
- Step 1(A) – Peel label sheets.
- Step 1(B) – Take two of the silicone backing pages and arrange them so they are on top of one other with the shiny side facing outward and the matte side facing towards each other.
- Step 2 – Staple the pages together. I usually staple one on each of the four corners, vertical and parallel to the edge of the paper. Pages may require a staple on each of the long sides as well to make moving stickers easier.
- Step 3 – Take a page protector and stick one of the blades of your scissors under the opening. Cut down the clear seam of the page protector until the tip of your scissors touches the bottom of the sheet. If you do this correctly, your page will have a small pocket which is to hold the sheet in place while still allowing easy access.
- Step 4 – Put the page in the protector and put it in your binder. That was the final step, your done!!

See, isn’t that super simple! You can make a sticker album just as good as a store-bought one for less!! If you decide to make one, please tag on my Instagram @PikaKiraKuzu! Id love to see your creative takes on this guide!
Thank you so much for reading! If you liked this article please consider subscribing to our website! Please do not copy, distribute, or repost our content without our knowledge. Sharing is always encouraged. – PikaKiraKuzu.com


Leave a comment